 CANON PIXMA IP8720 CANON PIXMA IP8720 When I was approached to test and compose a survey for the canon_pixma_ip8720 this printer, I thought, sure, I have broad involvement in printers, and I can set to the side my loyalties. I genuinely wasn't hoping to be excessively dazzled by it. I have been utilizing a specific brand since they initially presented an 8.5 × 11 inch, 3-variety "photograph" printer, many, quite a while back, and I have been extremely content with them.
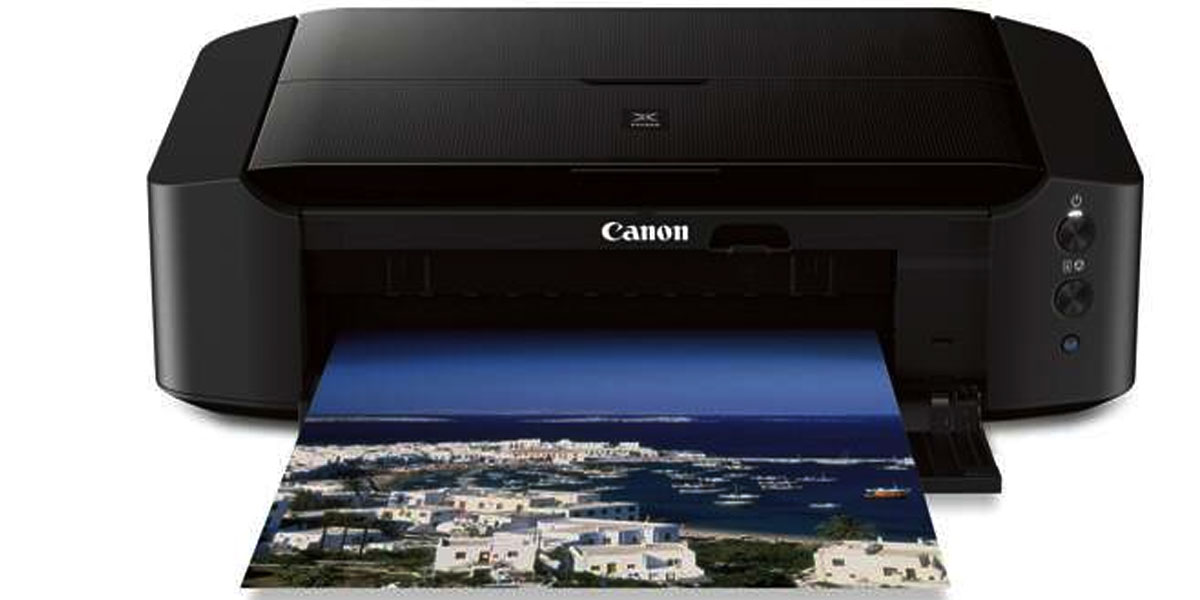
Quality and valuing Dislike Canon doesn't have a set of experiences in the printing business. They have been making huge, focused business machines for a long time (also their set of experiences with photography overall). I've been shooting Canon for thirty years and have never been disheartened with the nature of their stuff. So it ought to shock no one that they have fostered a top-quality, six tone (erring on this later) printer that is quick, productive, calm, and handles paper up to thirteen inches wide. Before we begin, let me provide you with a concise history of my printing experience. Before the advanced upset started, I worked for certain self-loader business printers and enlargers; heaps of foul darkroom science. I knew about the consistent observing and adjustment expected to keep the paper and science in line. I likewise had the honor of working intimately with a portion of the principal custom print shops of our most recent unrest. My degree of assumption for variety and difference is genuinely high along these lines. Initial feelings Straight out of the container, it is great. It is surely not a staggering footprint, thinking of it as prints thirteen-inch wide paper. In the wake of downloading the proper Canon Pixma iP8720 driver, the set-up was predictable, and I liked it. The one thing that I believed was the smart idea is that they composed the driver programming to help as far back as OS 10.6.8 for the Mac and Windows 7 for the PC. This was an unexpected treat and will be invited by a few independent companies, novices beginning, and we who won't fall into this new cycle of arranged oldness. Thus, thank you, Canon. It is prepared to print remotely and supports iOS, Android, and Windows RT, for any individual who needs to print straightforwardly from their cell phone. Testing When I initially started testing, I chose a wonderful photo of a lady of the hour I shot in one of my classes with sensitive features and sensible shadow detail and put it through the standard Photoshop modification that I would give anybody. I picked the Canon Photo Paper Plus Glossy II and set up the printer for A3+ 13"x 19" 33 × 48cm (borderless). The choices accessible to me in the printing programming were barely enough. The drop-down menu for Quality and Media gave me a decision of draft, typical or excellent print; obviously, I picked high. Variety Options offered a variety of remedy sliders for RGB, power, and difference alongside a splendor menu of light and typical or dim that will assist with any strange variety shift you could insight. Notwithstanding, if you need reliably great quality prints or run a studio of any size, your screens should be aligned routinely. The borderless menu gives you an intriguing choice. Likewise, with all borderless printing, the picture should be extended a piece to get to the edge of the paper. You have a slider that allows you to limit or expand how much that growing variable. The last menu is direct and will enable you to make an edge that suits you. For the principal test print, I kept every one of the choices in the default modes, and I could not be more joyful (that won't ever occur). The complexions were spot on, the shadow regions read pleasantly, and a borderless 13 × 19 inch extension required four minutes. I pushed this printer hard during the following several days and attempted to get as far as possible. However, I don't think it has any. I alternated between the reflexive and semi-sparkle papers, printing a portion of my stock pictures from clear scene scenics to quit for the day and bugs. The printer, paper, and ink mix performed similarly well with all. Thus, then, at that point, I figured I would entangle it and print a portion of my Corel Painter drawings. I could nearly hear the printer giggling as it printed the picture, and the outcomes closely resembled my screen. To make highly contrasting pictures from your variety of records, my idea is to pursue the transformation in your programming decision. Under the Quality and Media menu, consistently pick the "Grayscale Printing" button to wipe out any variety cast. You empower the Tone slider under the Color Options menu when you select that button. An entire +50 of one or the other cool or warm, will give you a decent generally speaking tone suggestive of delicate selenium or sepia separately. Here is a portion of the elements that work for me The goal — is 9600 × 2400. What's not to cherish there? Six ink tanks, one of which is a twofold size color based dark for fresh text, Gray, Black, Cyan, Magenta, and Yellow Chromalife100+ inks Excellent ink fly spout beads. The Stapling Margin, a simple method for offing focus on your business introductions Page Layout printing is convenient for making little renditions of your introductions or economical (otherwise known as modest) pamphlets. Utilized, the 2up determination will turn your show to an even (scene) design, so assuming you have the typical vertical (picture) fasteners, this may be useful assuming you pick the 4up choice. Auto shut off — If you are utilized to your printer continuously being on, you should get used to this one stopping itself after a time of non-use. Eventually, this benefits everybody's energy bill and, generally speaking, energy protection. Calm mode — It is without a doubt calmer than the standard model, yet the typical printing mode is surely sufficiently peaceful to get rolling and hit the hay, expecting that you work at home Inherent remote — everything is going versatile so this choice will be useful. End There are a lot of other pleasant highlights that you could conceivably utilize. However, by and large, the absolute best thing about this printer is that you can connect it and make truly decent prints from the outset. For the high-level picture taker to the independent venture or studio, this would be an ideal printer to make lovely prints up to 13 × 19 crawls as well as all the business records you may at any point require. If you are like me and haven't investigated what is accessible available, I propose you investigate this model from Canon and perhaps, while you're out, see what else is out there.
0 Comments
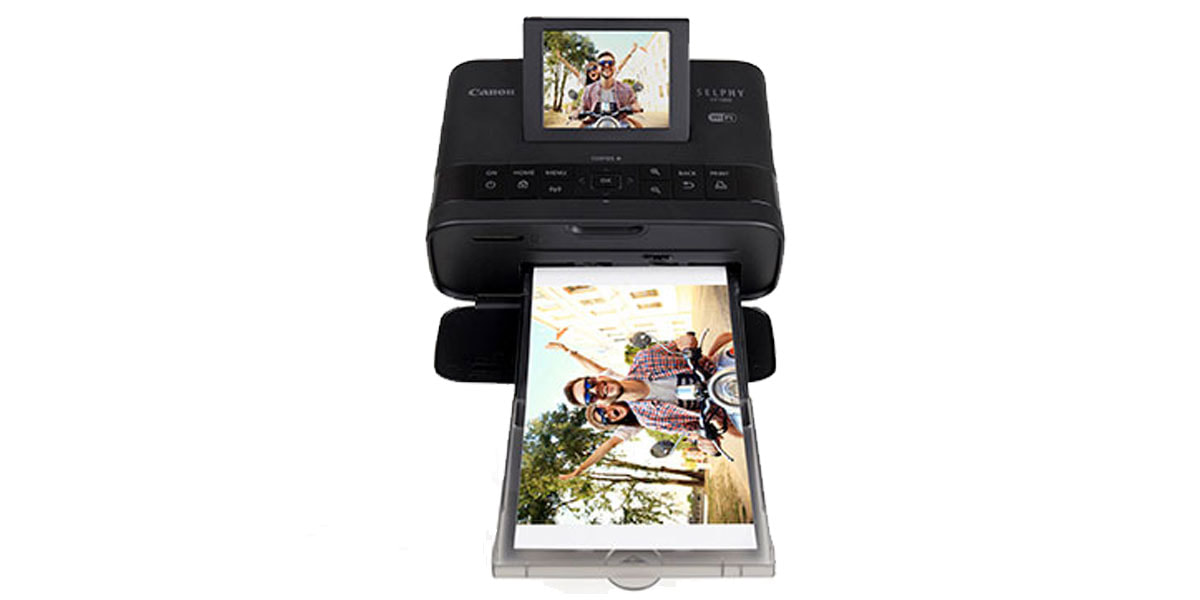 CANON SELPHY CP1300 REVIEW- The Canon Selphy CP1300 didn't get going at the first spot on my list of printers I was keen on. I didn't realize the thing existed when I began looking. As I managed accessible printers and elements and contemplated what I was required, this little printer recently held ascending to the top. Furthermore, truly, I attempted to overlook it and excuse it. Be that as it may, over and over, it recently continued to wind up in the main a few printers I was thinking about.
The Selphy CP1300 is an altogether different printer than I have utilized in the past for photographs. First off, it just prints 4x6 images. This may be an issue for some, yet it is acceptable for me since that is all I require it for. In any case, the greatest distinction with this little printer is that it doesn't utilize ink. Believe it or not, google Canon Selphy CP1300 ink, and you'll find that there is none. It uses hued film applied to the paper in a four-pass interaction to make your images. Also, that is the explanation I chose to purchase this printer! This printer is little. The conservative size is great for transport; however, you have a few removable pieces that need to go with you. The paper plate confines and is somewhat off-kilter and massive. It feels like something I could neglect to snatch one day. It joins to the front of the printer quite effectively, and regardless of its clumsiness, it has a truly incredible element. When taken out, the paper plate closes to safeguard the paper you have stacked. So great job, Canon. Assuming you will make a PITA removable plate, you ought to essentially make it with the goal that it serves as a paper holder. You additionally need to convey something to control the gadget. There is a discretionary battery pack, which I didn't jump on. The power supply is little sufficient that it's anything but a tremendous issue, yet ensure you remember it assuming you take this printer out and about. Setting the printer up was simple. Plugin the power supply, snap in the paper plate, and you're all set! I needed to press the power button for what felt like seemingly forever before the Canon image showed up on the screen. I completely thought the thing was broken because it took such a long time to control. The film cartridge loads in from the right side, and the paper slides into the plate. If you didn't peruse the directions, the reflexive side of the paper goes up! Printing to the printer was considerably more straightforward. Truly the least demanding print experience I have at any point had. Utilizing my MacBook Pro 13" M1, I had the option to print from both Adobe Lightroom Classic and Capture1 with zero set-up and zero issues. Typically when I print photos, I utilize my Canon Pro-10, and there are generally countless elements and settings to change. Simply being able to hit print and its print is great! We printed a few test photos from my telephone and iPad Pro, and my better half printed a few photos additionally from her gadgets. There were no issues with any gadget. We just hit print and things printed! You can associate using Bluetooth, wifi, Canon Pictbridge, or embed an SD card. This little printer has many network choices that work for pretty much every circumstance! Printing is quick. The Selphy CP1300 gets the paper through and afterward passes to and fro multiple times. A little variety speck on the printer show lets you know what variety (Yellow, Magenta, Cyan, and Clear Overcoat) is printing right now. The whole interaction requires about 60 seconds from when you press the print button until you have a print. Interestingly, there is no wet ink to permit it to dry or set. When the image prints, it is finished! Image Quality These prints look pretty great on our cooler! So I've utilized a portion of these little sublimation printers previously. The quality has forever been not exactly great. I had a ton of hesitations about purchasing this printer due to those previous encounters. In any case, I was stunned at how great the quality was at the point at which the main print emerged. It looked great. Quite great! The tones were lively and consistent with precise. We printed a ton of photos and were truly intrigued. The complexions were often somewhat immersed, which was frustrating because the complexions are truly significant. If you desire to find an opportunity to make a variation and over immerse the complexions, the image comes out alright. Try not to misunderstand me. It is not awful, somewhat under soaked. We additionally saw something truly abnormal. With lively blue tones, the prints lost LOTS of detail. However, it possibly happened when you had different shades or upbeat blues together. It didn't occur as recognizably with different tones. The degree of detail and freshness was great in practically all photograph regions. This principal sublimation printer I have utilized truly creates great prints. I've been keeping away from this sort of printer for some time. However, presently, I'm interested in evaluating some better quality printers in this section. The Paper The paper for this printer (Canon RP-108) arrives in a pack that incorporates paper and cartridges. You get 108 points for each pack, making this a reasonable strategy for printing images. The paper is gleaming, and the completion is great. The paper has an abundance of tabs on the printer's end to get the paper and feed. They are punctured and removed, which is a tad of a drawback. In any case, I chose it wasn't a huge issue. The Final Verdict Assuming that you're searching for a printer to keep at home and print images from your telephone or something you can take with you and make prints effectively on the fly, this printer is most certainly for you. It's reasonable. Amazon has them accessible constantly, the paper/cartridges are reasonable, and you never need to stress over your ink attempting up or expecting to get a yellow ink cartridge. I've destroyed mine, and it is holding up fine and dandy. I would prescribe it as an extraordinary printer to have around! 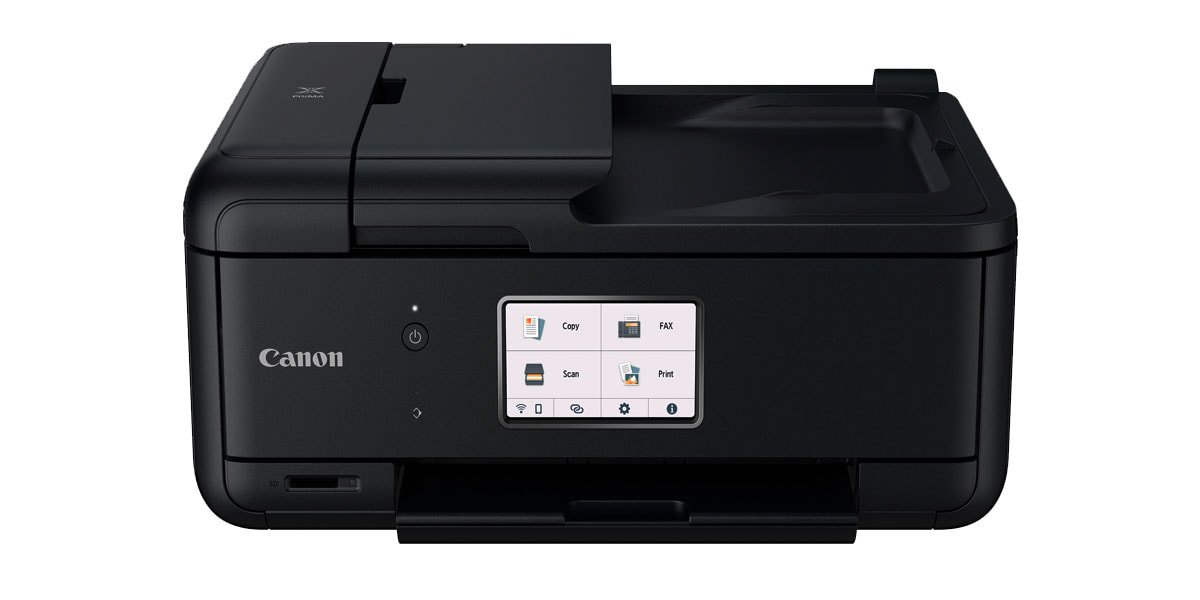 The Canon Pixma TR8620 is an inkjet across the board with a home office highlight. The TR8620 uses five ink cartridges, with two types of the dark: one for reports (color based) and the other for polished photo prints (color based). The other three inks are standard cyan, red, and yellow.
The TR8620 also features a duplexer for two-sided printing and supports fine home coordination with Amazon Alexa and Google Assistant. Design: The TR8620 has a 4.3-inch main shading touchscreen on its control board, rotating 90 degrees upwards. There's no actual catch to the activity (only the force button). However, I found the touchscreen responsive and natural menus to explore. The SD card space is at the bottom left of the front board so that you can print directly from the camera's memory card. To use the ADF on the unit, you open the cover, which rotates outward to load as paper input. The TR8620 is equipped with a duplexer for two-sided printing, but programmed two-sided checking is not supported. To create a duplicate or output of a double-sided record, you must run the archive through the ADF twice, examining each side in turn. LCD offers realistic to ensure you place the file correctly to guarantee good results from the next side. for support, Visit Canon TR8620 Driver Download. The body estimates 17.3 inches (w) by 13.8 inches (d) by 7.5 inches (h). This is common on home inkjets across the board. Although the authority depth with stacked paper is 14.4 inches, I found that with the backplate sliding back and stacked with paper and the yield plate stretched out with the hooks folded forward, the full depth was expanded to 26 inches. Additionally, opening the ADF for use adds an inch in height. In particular, however, you should have satisfactory vertical freedom to raise the top to place the report on the flatbed scanner glass. The TR8620 can send faxes via a 33.6 kbps modem and accumulate up to 99 fax numbers and a limit of 250 pages in its memory. Print speed: Print speed on plain paper is slightly faster than normal. The TR8620 printed our five-page text report in 32.6 seconds (or 9.2 ppm) compared to the normal 8.8 ppm for the same model. Also, the TR8620 prints our six-page archive of mixed content and shadow designs in 1 moment, 52 seconds (or 3.2 ppm) in contrast to the normal 2 minutes, 13 seconds (or 2.7 ppm). Copy and scan speed: Fast replication seems to be the TR8620's best office capability. The TR8620 doubles the shadow record in 20.5 seconds from the flatbed—much faster than the normal 28.7 seconds. That doubled a page of text in 10.8 seconds, faster than the usual 16 seconds. Correlation-wise, the Editor's Choice TS9120 was slower at creating book duplicates (at 14 seconds) but faster at creating shadow duplicates, at 17.3 seconds. Print Quality: The TR8620 offers high print quality in general. The printing text is quite dim. The edges look very sharp, although the letterform could be slimmer. The shadow illustration is captivating, with the right tone and surface, although some fine lines are visible in the dull areas. Reflexive photos are printed with great precision: Natural-looking tones, crisp subtleties, and subtle changes. Duplicate quality is generally acceptable. The duplicate replicates the subtleties and nuances of the first archive very well: The graphics strongly follow the first, and the text appears a bit more condensed around the edges. Duplicate text notes are handled via the ADF, particularly with fonts that look fatter and have less sharp edges than the multiplications laid out on the flatbed. Settings and software: Setting up the TR8620 is basic: Remove some tape, press the force button, and insert the ink and paper cartridges. You print a printhead adjustment page following the on-screen guide controls and eject it. The printed quick start guide guides you to the Canon site to download and introduce the product. Putting the TR8620 in my remote organization was quick and helpful. After going to Wi-Fi settings in LAN settings on the TR8620 LCD screen, I selected WPS (push button strategy) and pressed the corresponding button on my remote switch. |
 RSS Feed
